Contact Us

If you still have questions or prefer to get help directly from an agent, please submit a request.
We’ll get back to you as soon as possible.

Please fill out the contact form below and we will reply as soon as possible.

  • Contact Us
  • Home
  • Customization Guides
  • Advanced Customization

Displaying Categories as Carousel

A simple guide on how to turn category list into a more interactive component such as carousel

Written by Alever Selosa

Updated at October 18th, 2021

Contact Us

If you still have questions or prefer to get help directly from an agent, please submit a request.
We’ll get back to you as soon as possible.

Please fill out the contact form below and we will reply as soon as possible.

  • Customization
    Customization Guides
  • Article Editor
  • Getting Started
    Managing Users Analytics Content Management Permissions & Accessibility Video Tutorials
  • Integrations
  • API & Webhooks
    API V2 API V3
  • Languages & Translations
  • Authentication
  • Swifty AI
  • Settings
    User Settings User Behavior Knowledge Base Settings Custom Domain
+ More

Overview

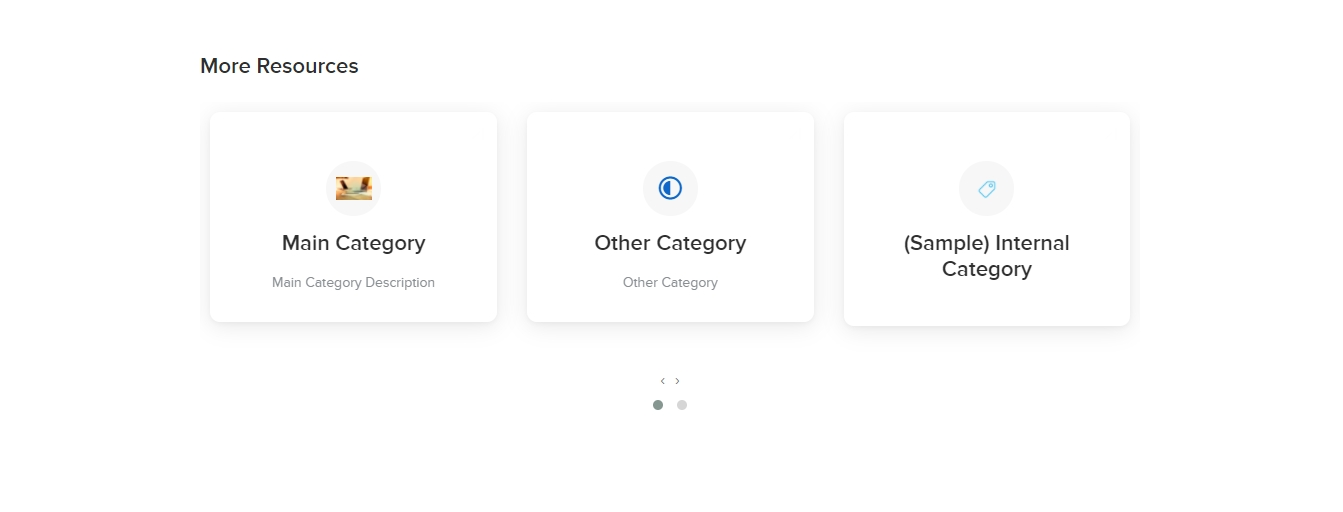
Carousel allows you to expose root categories or any loopable items without taking up a lot of space, which is especially useful if you have more than ten main categories to be rendered. Aside from that reason, it makes your KB site more appealing and interactive.

We can easily implement such components by using any third party plugin you want. In this example, we will be using Owl Carousel.

How to do it

  1. Insert necessary styles and script references to the Main Layout.

    First step is to get the necessary CSS and JSlinks from the third party carousel site and add those as stylesheet and script tags to the Main Layout (Customize -> Main Layout page)

    CSS:

    <link rel="stylesheet" href="https://owlcarousel2.github.io/OwlCarousel2/assets/owlcarousel/assets/owl.carousel.min.css">

    <link rel="stylesheet" href="https://owlcarousel2.github.io/OwlCarousel2/assets/owlcarousel/assets/owl.theme.default.min.css">

    JS

    <script src="https://owlcarousel2.github.io/OwlCarousel2/assets/vendors/jquery.min.js"></script>

    <script src="https://owlcarousel2.github.io/OwlCarousel2/assets/owlcarousel/owl.carousel.js"></script>


  2. Loop through root categories and apply the necessary markup from the carousel plugin

    Go to your Index page, replace the root categories rendering and apply the appropriate code which is patterned from carousel’s documentation. Implement categories looping on the said markup.

    <div class="owl-carousel owl-theme">

        {% for category in root_categories %}

        <div class="category">

            <a href="{{ category.url }}" class="card">

                <span class="icon">{{ category.category_icon_or_image }}</span>

                <h2>{{ category.name }}</h2>

                <p>{{ category.description }}</p>

            </a>

        </div>

        {% endfor %}

    </div>


  3. Initialize the carousel by applying the script to main JS

    In this case, you may just copy paste the setup and configuration code block that you got from the carousel’s documentation.

    $('.owl-carousel').owlCarousel({

        loop:true,

        margin:10,

        nav:true,

        responsive:{

            0:{

                items:1

            },

            600:{

                items:2

            },

            1000:{

                items:3

            }

        }

    })


  4. Style the Carousel based on the customer's preference

    And there you go. You can now apply finishing touches to make it more appealing, and fit to your preference.

Was this article helpful?

Yes
No
Give feedback about this article

Related Articles

  • How To Fix Duplicated Content For SEO Improvement?
  • How Can I Contextualize The Template?
  • Displaying The Most Popular Questions
  • Integrating Your Knowledge Base With Your Ticketing System
One Knowledge Base To Replace Them All
24/5 support
Constant Product Updates & Improvements
100% money back guarantee
99.9% Uptime
Features
  • AI Knowledge Base AI-Enabled
  • Helpjuice Extension AI-Enabled
  • Powered Editor AI-Enabled
  • Advanced Analytics AI-Enabled
  • Customizable Themes AI-Enabled
  • Swifty · Helpbar & Chatbot AI-Enabled
  • Multi-Language Support
  • Step-by-Step Tutorial Creator
  • Seamless Integrations
  • User Access Control
  • See All Features >>
Product
  • Product Roadmap
  • Pricing
  • Book a Demo
  • Policies & Security
  • Our Customers
  • About Helpjuice
  • Contact Our Team
Resources
  • Our Knowledge Base
  • Webinars
  • Success Stories
  • API Documentation
  • Data Import Guide
  • Helpjuice Blog
Copyright © 2025, Helpjuice Inc.
Helpjuice, Inc. is a registered US Corporation.
EIN 46-2257741 | Download W9
Made in America High Performer Ease of Use Get Support
Get Started For Free
4.8 average review on
Life’s too short to use mediocre software.
+1 (833) 387 3877
Powered by Helpjuice Helpjuice Swifty AI External Link
Expand